
Push Pull Technique
Learning to use your Fulcrum
Push Pull Technique
Learning to use your Fulcrum
Level up your playing with the Push Pull technique. Also known as the Throw Grab, this technique is used for achieving singles, doubles, and triples. Most rudiments end up being some combination of these three groupings, and as a result, this technique unlocks a skill set with a whole host of possibilities.
When executing the throw grab, the wrist plays one note, while the fingers play another. The wrist provides power while the fingers provide speed. Paired with the rebound that the drum can provide, this technique offers countless benefits.
Similar to a spring, your fingers act as shock absorbers. As tempos and dynamics vary, you will need to balance the tension in your hand to match the rebound you hope to achieve.
The exercises below will help in developing the push pull technique.

Practice Tips
When breaking down the push pull technique, there are 3 main steps to consider: prep, throw, and grab. Keep in mind that each step sets up the next to succeed. Below, you will find a list of check points in developing each step of this technique.
Prep. Like winding up before throwing a ball.
- Use the wrist and elbow to lift, not the fingers
- Keep the stick in your palm
- Fingers should remain “spring loaded” ready for the next step
Throw/Push. An open handed full stroke. For the best bounce possible, throw all the energy from your wrist in to the end of the stick . Consider the following:
- Stick should bounce back up to the up position
- Wrist should finish “hanging” in to the drum
- Like a lever, the stick should pivot at the fulcrum
- Stick should leave the palm but fingers should remain connected
- Fingers should be pointing down at the ground, not out or forward
- Be careful of tension, get out of the way of the stick without losing control
- Catch the stick at the top, don’t lift it, let the drum do half the work
Grab/Pull. A down stroke from the fingers.
- The wrist should already be hanging
- Pull the stick back in to the palm of your hand
- As tempos start to increase, the grab and prep start to merge in to one motion
Fulcrum. The stick should pivot at your fulcrum between your thumb and finger. This is very similar to holding the center of a fidget spinner.
- Try hanging the stick above your head. Open and close your hand and let gravity simulate this motion before trying it on a drum.
Bounce. Similar to bouncing a ball, if you are doing more than 2 notes, the fingers will be used to control the rebound.
- Once the stick reaches the up position, put just enough energy in to the stick to turn it around again
- If the stick touches the palm, rebound dies
- Don’t slap the stick, the fingers stay connected and in control
MP3
100 BPM
60 BPM
Exercises
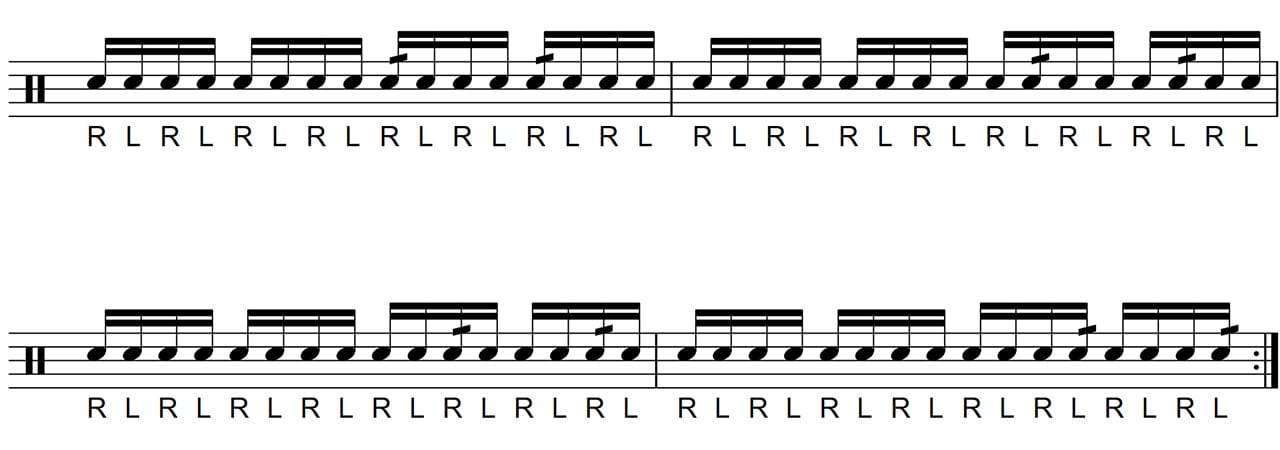
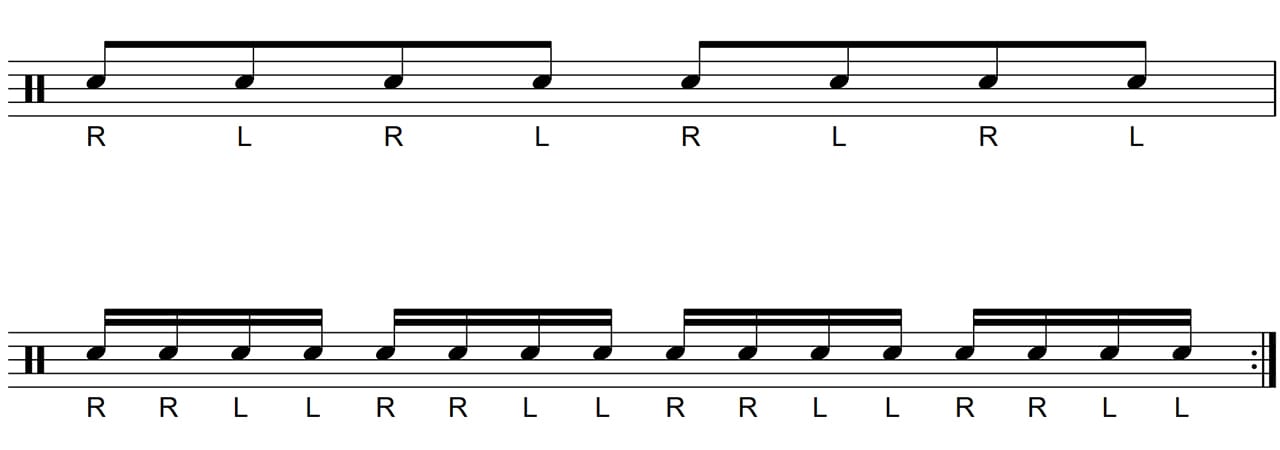
8s

As tempos start to speed up, you will need to start using more fingers and less wrist. Having a proper fulcrum is essential. Learn to dribble the stick with your fingers and not muscle out every note with the wrist. Continue to increase the tempo until it makes more sense to think of these 8th notes as 16th notes. The faster you go, the faster you will need to twitch those fingers (see twitch legatos). Here are a few tips to keep in mind.
- Prep early (at least a beat before)
- First notes on each hand are a Throw/Push
- Last notes on each hand are a Grab
- All notes inbetween are done with the fingers
- they should be full strokes ending in the up position
- let it bounce and catch it at the top, the drum should do half the work
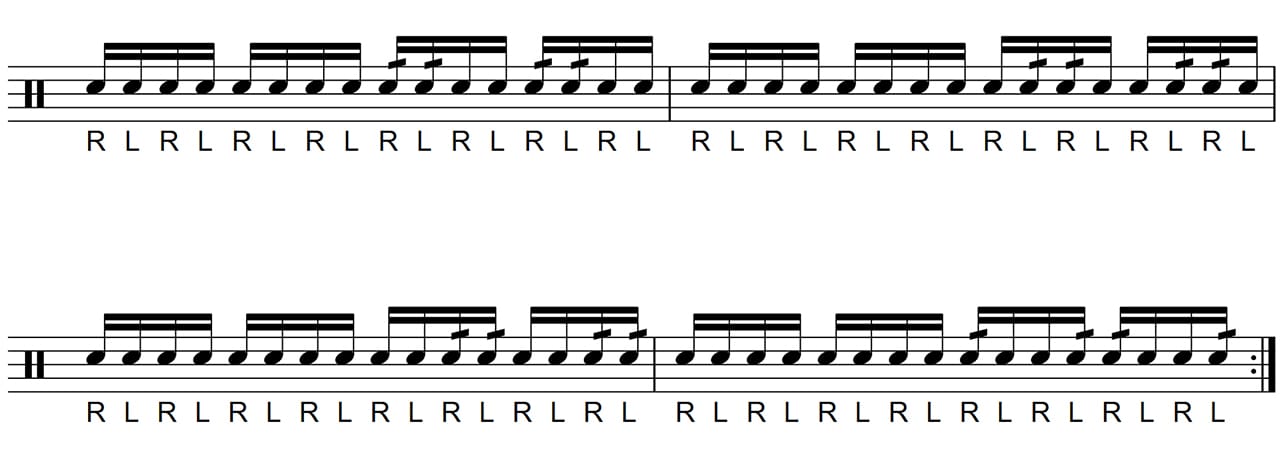
5s

As you start to remove notes from 8s, the technique remains the same. First notes are thrown/pushed (full strokes). Last notes are grabbed/pulled (down strokes). Continue removing notes. Try 4s, 3s, and 2s.
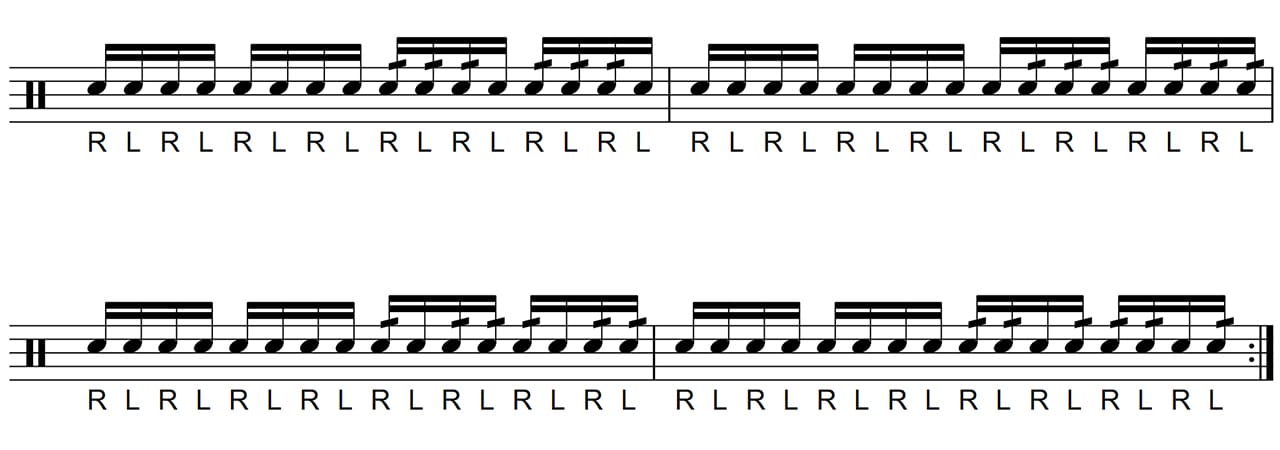
3s

Start combining the prep and the grab on the 3rd of each grouping. In one motion, as you start to pull the back end of the stick into your hand with your fingers, lift the front end of the stick with your wrist. This will help set you up for the next set of 3s on the same hand and avoid whipping.
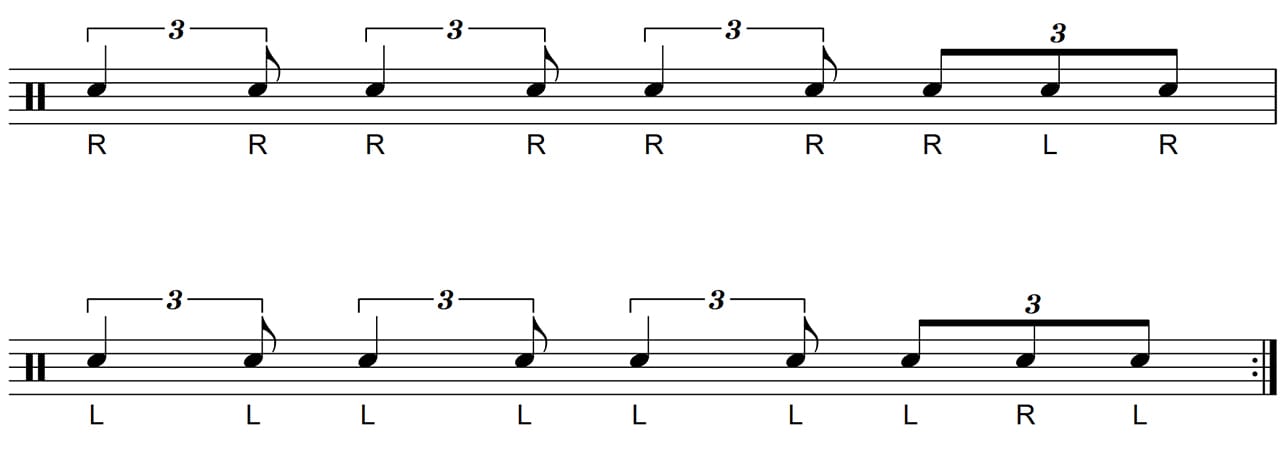
Triple Beat

Many rudiments use 3s. Check out triple stroke rolls and flam taps for starters.
- Version 1 – Play all notes at the same height. Work for even sound quality
- Version 2 – Let the notes decay in sound. First note big, second note medium, third note small.
Double Beat (Duple)

If you can dribble 8 notes or 3 notes, 2 notes should feel easy. Work for two notes that sound the same. As you speed up, the second note may not start at the same height as the throw, so you’ll need to speed up the velocity to compensate.
Double Beat (Triple)


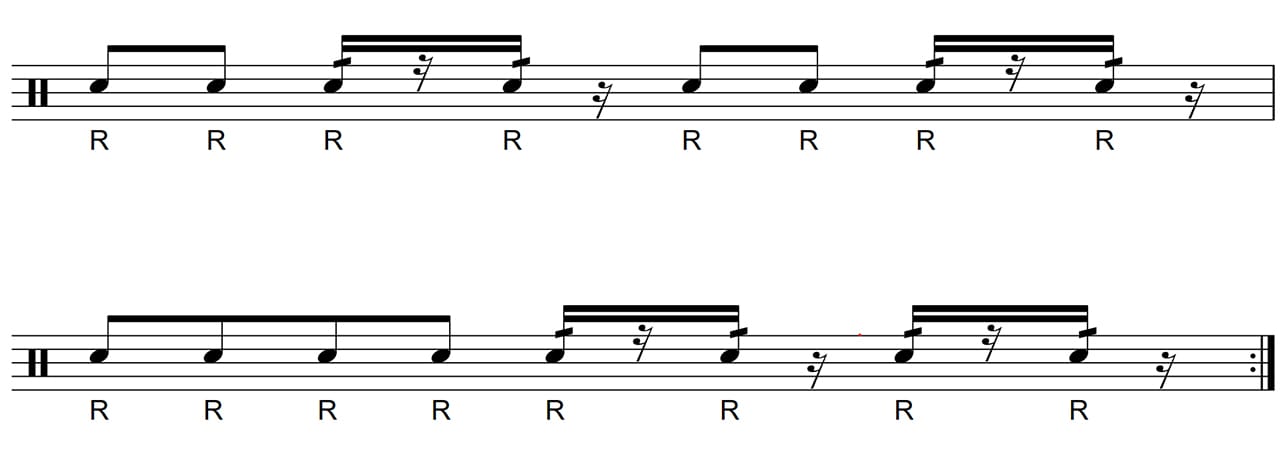
Diga Dut

Your wrist should never stop moving in an 8th note check. Fingers should only be used for Es and As. When working for a quality roll, your top 2 priorities should be as follows:
- Keep your wrist in time with the check
- Consider how much should you open or close your fingers
Checkerboard

As you get faster, you will need to pinch tighter at your fulcrum and pump from your elbows. Your elbows should start to replace your wrists and you should not open your fingers nearly as far.
Checkerboard Breakdown

As you work to develop checkerboard, be sure to isolate each hand. Make sure your heights and stroke types don’t change from check to diddle. Try the following:
- Right Hand Only (left can be taken out entirely or played on your leg, or on the rim of the drum)
- Left Hand Only (played on the down beats, not on the Es and As)
- Double Stops (compare your weak hand to your dominate hand)
Buzz Breakdown


Buzzing the rolls is a great tool in developing power in your diddles. As rolls get faster, the tension in your hand increases and, as a result, the differences between a buzz and a diddle are very small. The main difference has more to do with how long you stay on the head, which influences whether you produce 2 notes or more.
Triplet Diddle


Diddle Grid Drags
Diddle Grid 6s
Diddle Grid Each Hand

Diddle Grid 7s
Diddle Grid Rolls

Video Tutorials
Playlist

Transcript
Transcript
Where to Next?
Now that you have an understanding of rolls at one height, work to develop rolls at two.
Push Pull Technique
Learning to use your Fulcrum
Push Pull Technique
Learning to use your Fulcrum
Level up your playing with the Push Pull technique. Also known as the Throw Grab, this technique is used for achieving singles, doubles, and triples. Most rudiments end up being some combination of these three groupings, and as a result, this technique unlocks a skill set with a whole host of possibilities.
When executing the throw grab, the wrist plays one note, while the fingers play another. The wrist provides power while the fingers provide speed. Paired with the rebound that the drum can provide, this technique offers countless benefits.
Similar to a spring, your fingers act as shock absorbers. As tempos and dynamics vary, you will need to balance the tension in your hand to match the rebound you hope to achieve.
The exercises below will help in developing the push pull technique.
Practice Tips
When breaking down the push pull technique, there are 3 main steps to consider: prep, throw, and grab. Keep in mind that each step sets up the next to succeed. Below, you will find a list of check points in developing each step of this technique.
Prep. Like winding up before throwing a ball.
- Use the wrist and elbow to lift, not the fingers
- Keep the stick in your palm
- Fingers should remain “spring loaded” ready for the next step
Throw/Push. An open handed full stroke. For the best bounce possible, throw all the energy from your wrist in to the end of the stick . Consider the following:
- Stick should bounce back up to the up position
- Wrist should finish “hanging” in to the drum
- Like a lever, the stick should pivot at the fulcrum
- Stick should leave the palm but fingers should remain connected
- Fingers should be pointing down at the ground, not out or forward
- Be careful of tension, get out of the way of the stick without losing control
- Catch the stick at the top, don’t lift it, let the drum do half the work
Grab/Pull. A down stroke from the fingers.
- The wrist should already be hanging
- Pull the stick back in to the palm of your hand
- As tempos start to increase, the grab and prep start to merge in to one motion
Fulcrum. The stick should pivot at your fulcrum between your thumb and finger. This is very similar to holding the center of a fidget spinner.
- Try hanging the stick above your head. Open and close your hand and let gravity simulate this motion before trying it on a drum.
Bounce. Similar to bouncing a ball, if you are doing more than 2 notes, the fingers will be used to control the rebound.
- Once the stick reaches the up position, put just enough energy in to the stick to turn it around again
- If the stick touches the palm, rebound dies
- Don’t slap the stick, the fingers stay connected and in control
Mp3
100 BPM
60 BPM
Exercises
8s

As tempos start to speed up, you will need to start using more fingers and less wrist. Having a proper fulcrum is essential. Learn to dribble the stick with your fingers and not muscle out every note with the wrist. Continue to increase the tempo until it makes more sense to think of these 8th notes as 16th notes. The faster you go, the faster you will need to twitch those fingers (see twitch legatos). Here are a few tips to keep in mind.
- Prep early (at least a beat before)
- First notes on each hand are a Throw/Push
- Last notes on each hand are a Grab
- All notes inbetween are done with the fingers
- they should be full strokes ending in the up position
- let it bounce and catch it at the top, the drum should do half the work
5s

As you start to remove notes from 8s, the technique remains the same. First notes are thrown/pushed (full strokes). Last notes are grabbed/pulled (down strokes). Continue removing notes. Try 4s, 3s, and 2s.
3s

Start combining the prep and the grab on the 3rd of each grouping. In one motion, as you start to pull the back end of the stick into your hand with your fingers, lift the front end of the stick with your wrist. This will help set you up for the next set of 3s on the same hand and avoid whipping.
Triple Beat

Many rudiments use 3s. Check out triple stroke rolls and flam taps for starters.
- Version 1 – Play all notes at the same height. Work for even sound quality
- Version 2 – Let the notes decay in sound. First note big, second note medium, third note small.
Double Beat (Duple)

If you can dribble 8 notes or 3 notes, 2 notes should feel easy. Work for two notes that sound the same. As you speed up, the second note may not start at the same height as the throw, so you’ll need to speed up the velocity to compensate.
Double Beat (Triple)

Diga Dut

Your wrist should never stop moving in an 8th note check. Fingers should only be used for Es and As. When working for a quality roll, your top 2 priorities should be as follows:
- Keep your wrist in time with the check
- Consider how much should you open or close your fingers
Checkerboard


As you get faster, you will need to pinch tighter at your fulcrum and pump from your elbows. Your elbows should start to replace your wrists and you should not open your fingers nearly as far.
Checkerboard Breakdown
As you work to develop checkerboard, be sure to isolate each hand. Make sure your heights and stroke types don’t change from check to diddle. Try the following:
- Right Hand Only (left can be taken out entirely or played on your leg, or on the rim of the drum)
- Left Hand Only (played on the down beats, not on the Es and As)
- Double Stops (compare your weak hand to your dominate hand)
Buzz Breakdown


Buzzing the rolls is a great tool in developing power in your diddles. As rolls get faster, the tension in your hand increases and, as a result, the differences between a buzz and a diddle are very small. The main difference has more to do with how long you stay on the head, which influences whether you produce 2 notes or more.
Triplet Diddle


Diddle Grid Drags


Diddle Grid 6s


Diddle Grid Each Hand


Diddle Grid 7s


Diddle Grid Rolls


Video Tutorials
Playlist
Transcription
Transcription
Where to Next?
Now that you have an understanding of rolls at one height, work to develop rolls at two.
